Updating a kitchen can seem like a daunting task. However, there are some easy things that you can do to get the most out of your budget. My husband and I had the task of updating a kitchen in one of our rental properties. It was an old kitchen that was in desperate need of a makeover. I would have loved to have just gutted the whole thing and started over. However, because our budget didn’t allow for that big of a renovation, we chose some easy updates that gave a lot of bang for the buck.
This post contains recommended product links. If you make a purchase through one of the links, I may earn a small commission at no cost to you.
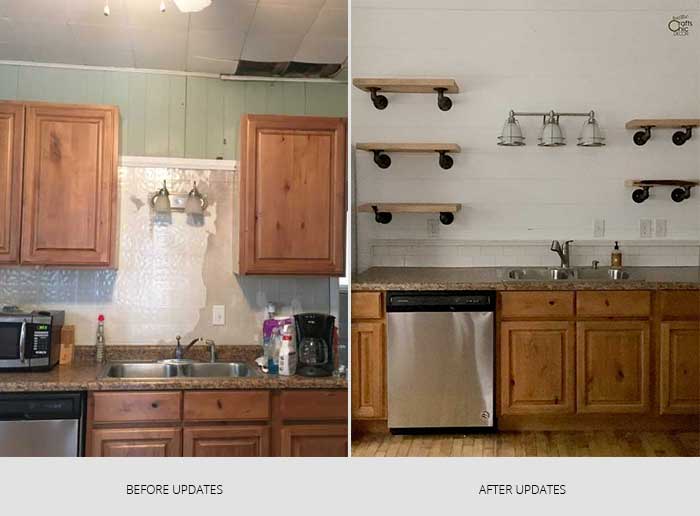
To start, let me show you the main area that needed help. Because there had been a water leak from the unit above this one, the wall and ceiling were damaged and in need of repair. We previously had updated some of the old appliances so luckily we were all set there. I’ll show you how to update a kitchen in other ways.
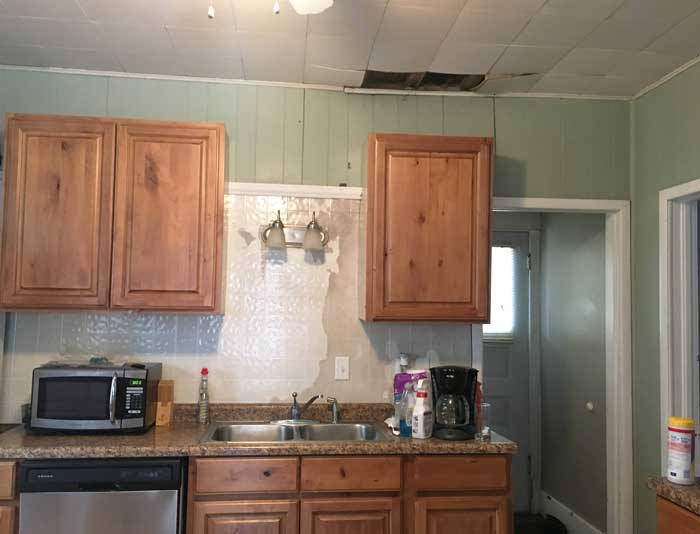
There are so many things that I dislike about this kitchen. One of those things is the ceiling. However, since we wanted to put our money elsewhere, we simply replaced the damaged tiles and then repainted the whole ceiling. What we did focus our attention on was the entire wall, cabinet situation, sink and faucet, as well as the light fixture.
11 Kitchen Updates To Add Wow Factor
Because we wanted to add as much style as possible, we made some changes that would bring this kitchen closer to what is trending right now. That meant we needed some shiplap, subway tile, open shelving, and bright new paint. All of these things plus a couple of other updates would give this kitchen a rustic farmhouse feel. A true rustic DIY decor project! All of these ways to update a kitchen are pretty easy and affordable.
1. Shiplap Over Old Wall
The previous wall in the kitchen was a mixture of painted paneling and a panel of fake tile. We removed all of it. To add style and durability to the wall, we installed tongue and groove shiplap.
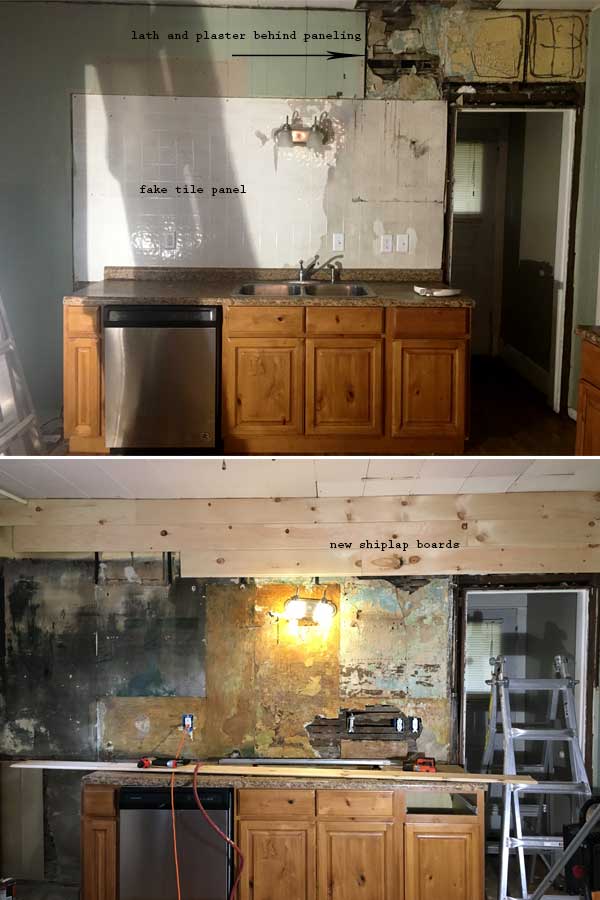
After removing all of the loose plaster, we were left with a flat surface to apply our tongue and groove boards to. It was easy to see where the studs were at the top of the wall.
Starting at the top, the boards were nailed to the studs with the tongue at the top and the groove at the bottom. We used an air compressor and air nailer to make the job quick and easy. Each new row of boards were installed the same way. The top tongue fit into the groove on the boards from the previous row.
2. Paint Walls And Ceiling
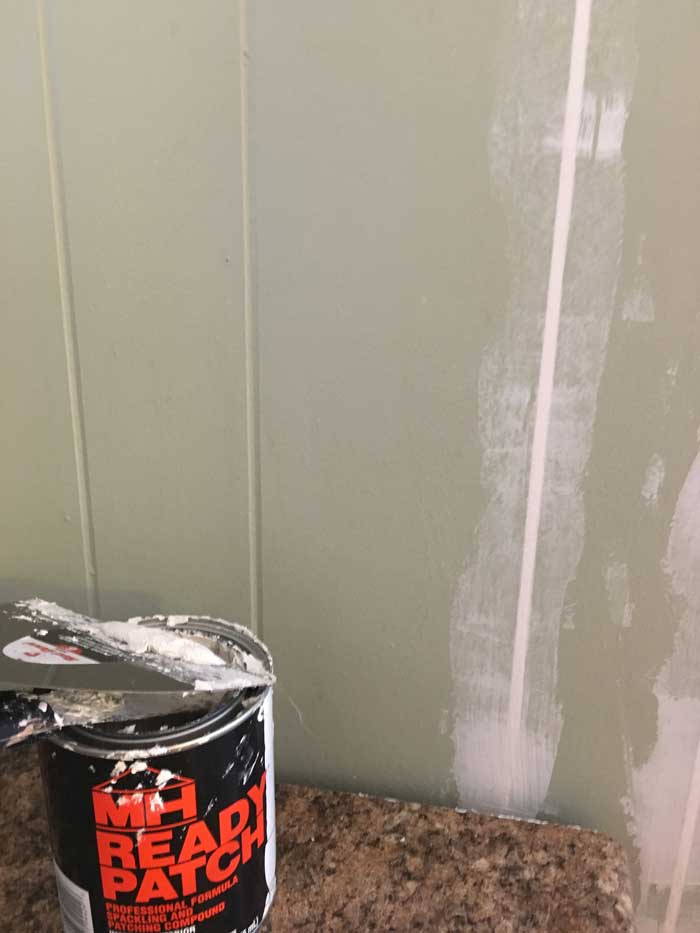
There is nothing that freshens up a kitchen more than a nice new coat of bright paint. For a small kitchen space, a neutral white creates more of a spacious feel. That is what we did for this kitchen. Since the other two walls in the kitchen also had the painted plywood, I filled in the grooves first with MH Ready Patch spackling. I wanted flush walls to meet up with the shiplap wall.
Besides grooves in paneling, it’s a good idea to fill in any holes with the spackling before adding a fresh coat of paint. You can use a small putty knife for holes but a six inch wide putty knife is best for large areas or grooves in plywood.
Once all of our grooves and holes were filled in, we painted the shiplap, paneling and ceiling. We used Magnolia Home in true white.
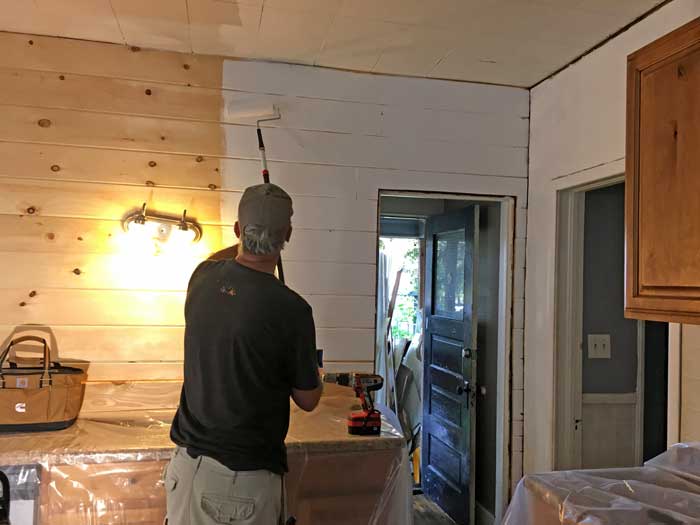
My husband rolled on the paint and I filled in the gaps with a brush. As you can see, we also got rid of all of the old trim. Once the painting was complete, we installed all new ceiling, door, and floor trim.
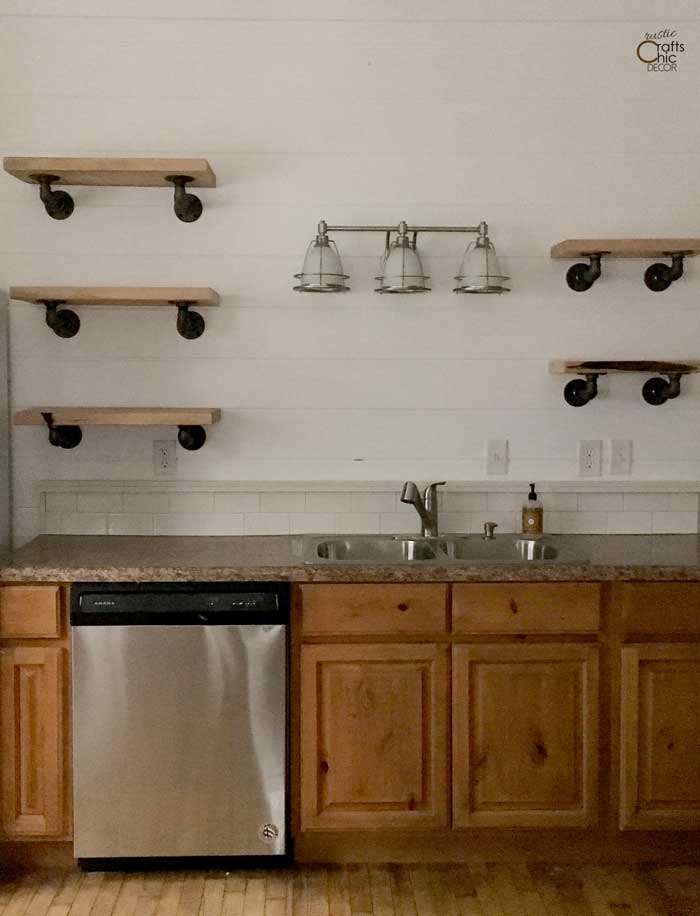
3. Add Rustic Industrial Open Shelving
We didn’t want to cover up all that new shiplap with upper cabinets so instead we went with open shelving. For the shelves, we went with two inch thick construction wood. Three shelves are eight inches deep and three are six inches deep.
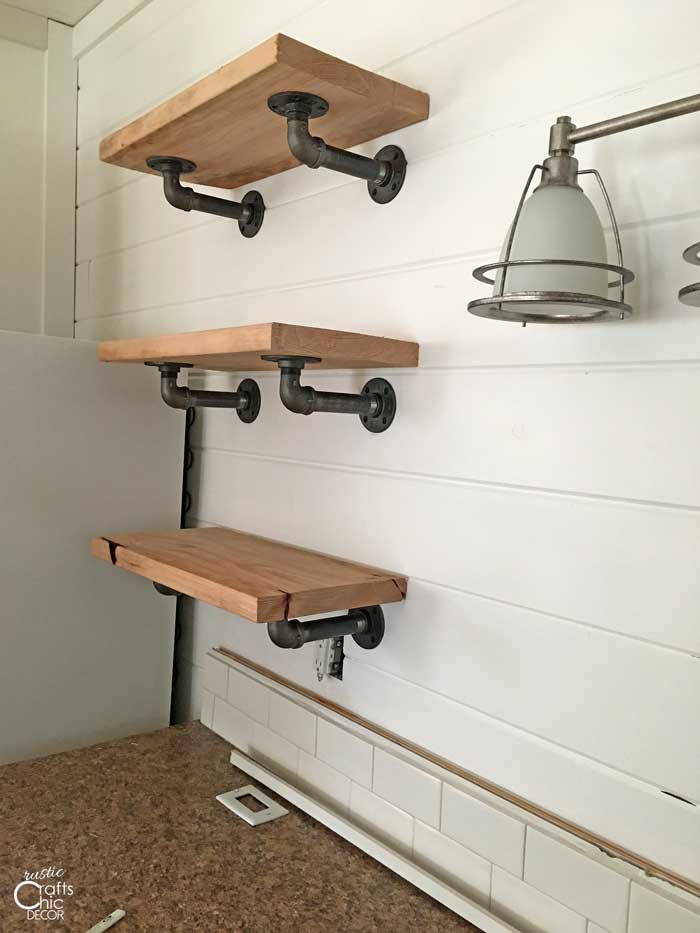
For an industrial look, we made the brackets with one inch diameter black plumbers pipe. Each bracket required a six inch straight pipe, one street elbow, and two flanges.
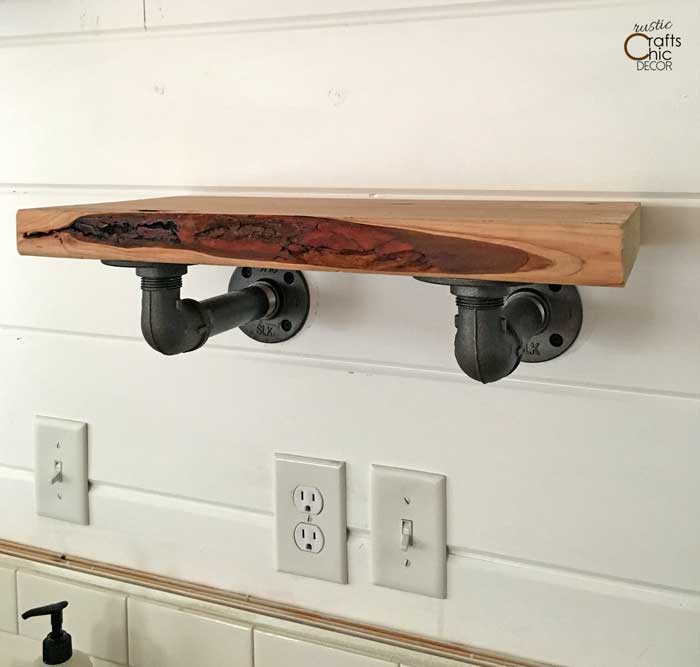
Because we used a rough construction lumber, we got a cool live edge look to the shelf. The nice part is that this wood is cheaper than cleaner construction lumber. I really like the rustic feel it has going on.
4. Rearrange Cabinets
Rearranging cabinets is not the easiest thing to do. However, in an old home it can be beneficial. Since we had replaced the upper cabinets with open shelving, we had the ability to reuse those cabinets in another spot.
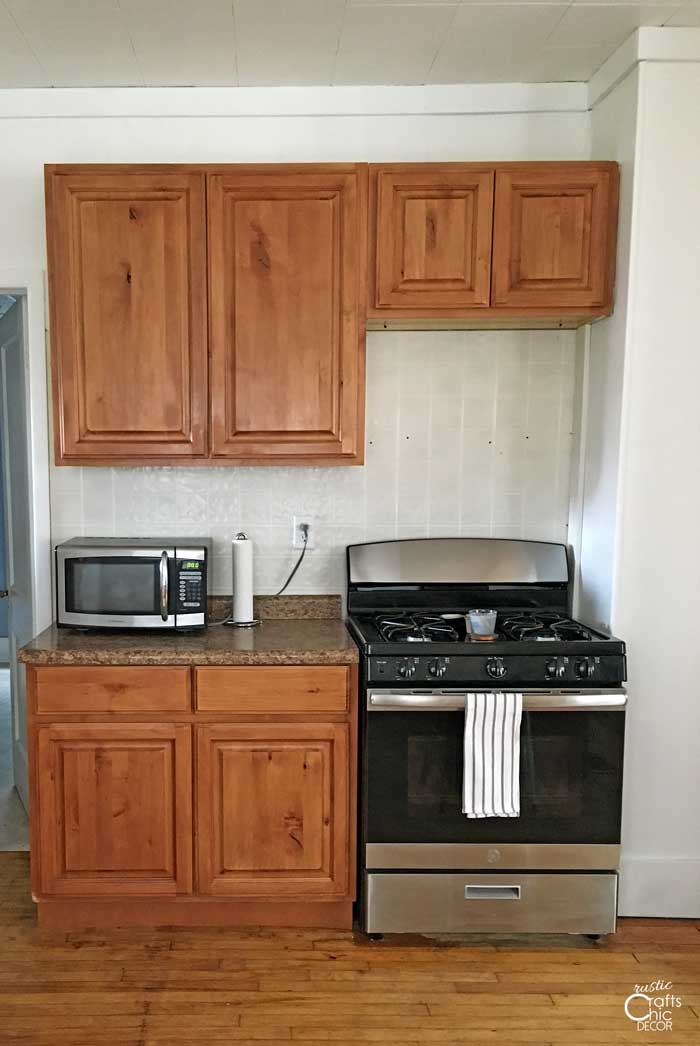
I didn’t take a before picture of this part of the kitchen. However, the only upper cabinet was the one over the stove. There was also an old microwave that no longer worked under the cabinet.
The wall was a big section of that fake tile panel. There was nothing wrong with that other than it was pretty greasy and grimy. I simply cleaned it up and then thought to move the upper cabinet over to that wall. Not only would it add more function but the cabinet helps to cover all of that tile.
Like a lot of projects that my husband and I do together, we used an untraditional and potentially disastrous way to install the cabinet. We used the box that the sink came in, with the new sink still in it, as a way to prop up the cabinet in place.
It was a little too high so we pulled the sink box toward us and leaned the cabinet back at an angle. My husband then screwed the top in place. Then, we had to unwedge the box from under the cabinet while I was trying to hold the cabinet in place.
Somehow some way we freed the box and my husband added more screws. When we put the level to it, it was perfect! Lucky again!
If you are interested in moving your own cabinets, I would recommend this guide for cabinet installation and not our crazy method.
5. Add Some Subway Tile
Plain white subway tile is super inexpensive and relatively easy to install. I used my favorite Loctite Power Grab construction adhesive to apply the tiles. The method is very similar to installing interior thin brick. In fact, I use the same running bond pattern.
To cut some of the tiles, I used a ceramic tile nippers. You have to chip away at the tile in sections but it does work good.
I butted the tiles together when applying and this still leaves a natural gap. Once all of the tiles were in place, I applied white pre-mixed grout with a putty knife. I put it on thick over the seams and didn’t worry about getting grout all over the tiles. As soon as I was done with a small section, I just went over the tiles with a wet sponge to clean up the grout. Once clean, the grout only stays in the seams.

Since we knocked off the old laminate back splash, we had to add about a one and a half inch thickness of wood between the shiplap and the tile. The trim you see in front of the tile was used to cap the tile section off.
6. Install New Sink And Faucet
I would like to say that installing a new sink and faucet is an easy job. For me it was. I just supervised. My husband hated the process. When we had to install a new sink and faucet in our condo, we hired a plumber. That is what I would recommend especially if you are dealing with old pipes.
As far as kitchen updates that offer a lot of impact, a new sink and faucet definitely fit the bill.
7. Change Out Light Fixtures
New light fixtures can also give a fresh update to a tired kitchen. All you have to do is turn off the power, untwist the wires for the old light fixture, twist the wires of the new fixture in place.
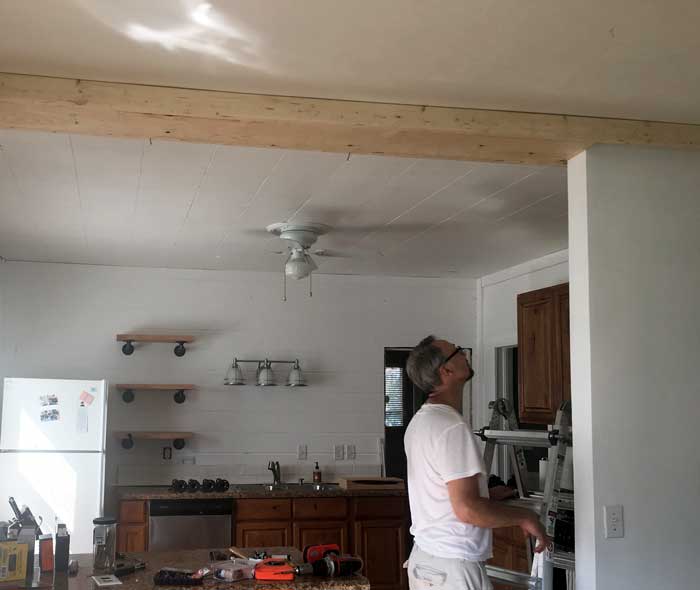
8. Build A Faux Ceiling Beam
A wood beam on a ceiling can add a lot of interest to an otherwise boring area. It also can help to create a natural divider between two different ceiling styles. That was the case for our kitchen going into the living room. We had the square tile ceiling in the kitchen and a flat ceiling in the living room. A wooden beam creates a nice transition between the two.
9. Paint The Cabinets
Although we opted to not paint the cabinets for this rental, it would be a great way to give a fresh look in your own home. Painted cabinets don’t have to be just white either. A shade of gray is a popular look right now too.
10. Add Cabinet Hardware
An easy kitchen update is to simply add decorative cabinet hardware. Whether you purchase new hardware or make your own, the addition will add more style to the space.
11. Update Appliances
Old appliances can really age a kitchen. We have started replacing all of the appliances with stainless steel and still need to upgrade the old refrigerator which is white with lots of wear. Another option to purchasing a new refrigerator that runs well is to simply paint over it with appliance paint. That may be enough to freshen up the space.
How To Update A Kitchen Before And After
For more ideas on how to update a kitchen, check out the following posts.