Birch lamps are one of my favorite projects. This DIY birch lamp has a little twist from our normal lamps. Since it was going in my office, I personalized it in a chic and feminine way.
How To Personalize A DIY Birch Lamp
I bought a wood burning pen a while back and have just recently began to use it. In fact, this is only my second project using the pen. However, I will be doing a lot more because it is just so much fun!
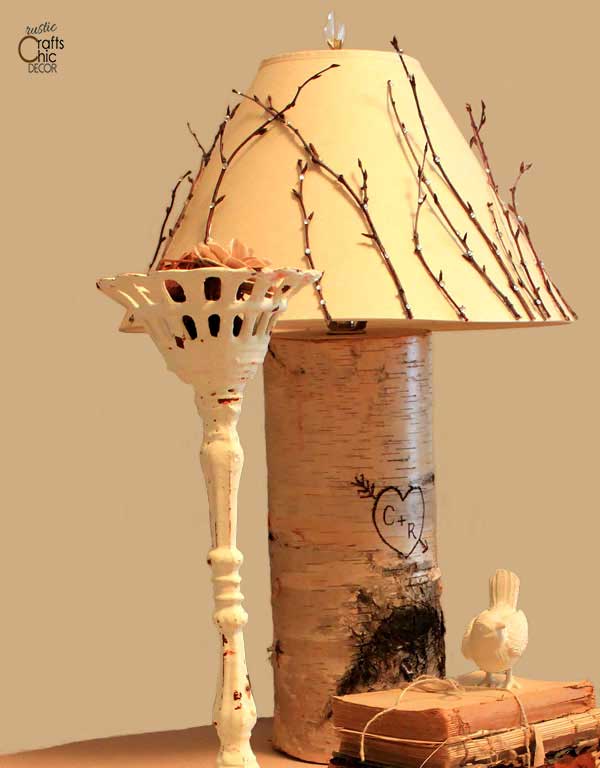
I had seen wood burning on a birch vase before which gave me the idea to use it on some of my birch projects. Since I had this lamp sitting around, I figured it was the perfect candidate to try out a little burning. I liked the idea I had seen for putting initials and a heart on the birch tree. After all, it is what you would expect to see carved out on a tree!
If you want to make your own lamp, first see my tutorial for building a lamp. I have step by step instructions and ideas for many different lamps and shade options for a DIY birch lamp.
Supplies Needed For Complete Project
- birch log
- lamp building kit
- wood burning pen
- lamp shade
- birch twigs
- hot glue
Wood Burning Instructions
To make a wood burned design you can either first draw something out in pencil or simply use the wood burning pen free hand like I did. I like to use the pencil tip end for the pen because it is easy to control and you can start with a thin line and go over it for a thicker line. There should be several ends that come with the pen and a diagram for the types of designs you can make with each end. Work slow and carefully to get a nice even line.
If you don’t want to make a lamp, you could simply do wood burning on a birch log. The craft tutorials that I have for birch candles and bird houses could also be embellished a little with some wood burning.
The Lamp Shade:
This shade was super easy to do. I simply trimmed several birch twigs and hot glued them directly to the shade. I tried to vary the heights and direction of the bend to give an interesting pattern to the finished shade.
Then, I added some small clear glass sequins to the branches with tacky glue. I wanted them to look like trees I see in the woods that are covered with ice crystals.