The snow has started to fly which makes me ready to start decorating the house with snowmen. I love having a variety of different sizes and styles throughout the house. They are all so cute! I wanted to make one in a rustic style to go with some of our other rustic decor and figured that the best way to do that would be with birch. I’ll show you how to make a birch bark snowman quickly and easily.
Instructions For How To Make A Birch Bark Snowman
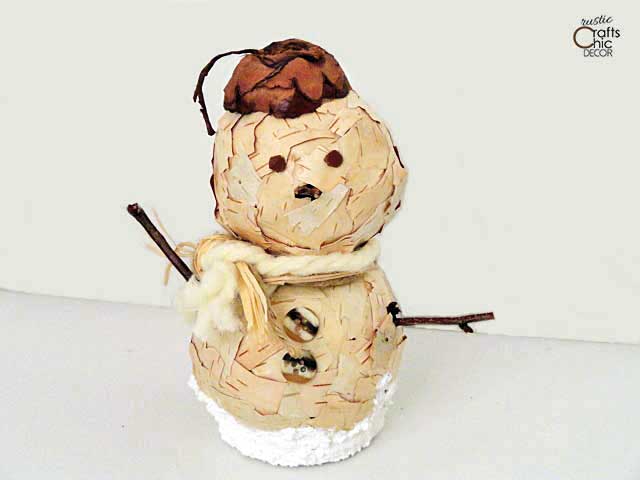
With birch bark being white it makes a nice covering for my styro-foam balls that make up the body of the snowman. And, of course, a couple of thin birch twigs are perfect for the little arms. For the rest of the parts, I relied on my trusty bag of potpourri to make up the embellishments along with a couple of vintage buttons.
This craft was fun to do and as each embellishment was added, the snowman began to gain some unique personality. Here is what I did.
Birch Bark Snowman Materials
- two styro-foam balls, one a little smaller than the other
- one toothpick
- birch bark (can be purchased if you don’t have access to)
- potpourri pieces
- Mod Podge decoupage, matte finish
- paint brush
- buttons
- tacky glue
- recycled jar lid
- snow-tex
Step By Step Instructions
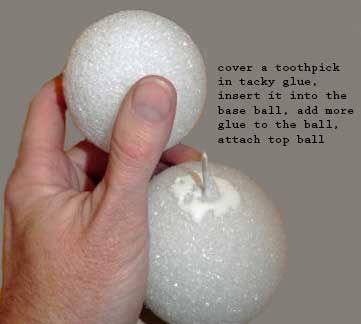
1. Attach your two styro-foam balls together by inserting a toothpick, covered with tacky glue, into each of the two balls. Apply some extra glue on the styro-foam for a firm hold.
2. Tear your birch bark into small pieces, about 1/2 inch rough squares, so they are easy to apply. The bark should be nice and thin for flexibility. Using your Mod Podge decoupage, begin applying the pieces to your styro-foam. First apply a layer of the Mod Podge to the ball and then another layer to your bark. Finish with more Mod Podge over the top of the bark to seal. Layer your pieces in a rough pattern. You will end up with irregular circles which will look more natural for a snowman.
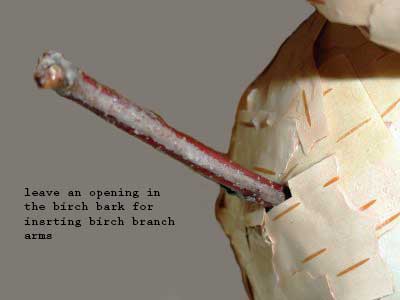
3. When you get to the side of your large ball, insert a small birch twig into the styro-foam for the arm. Do this before covering with birch for easy installation. Add your birch bark pieces around the twig when you are done.
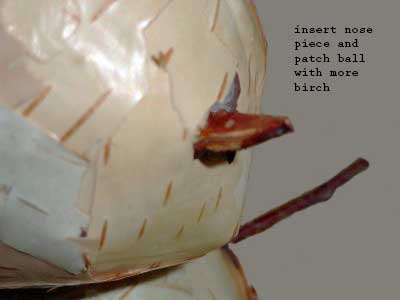
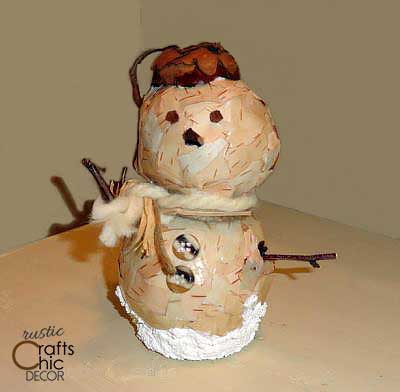
4. Use a piece of potpourri that is a nice shape and size for a nose. You may have to cut a piece down a little bit for your liking. Insert it into the foam just like the arms and then adhere the birch bark around the nose when you are through.
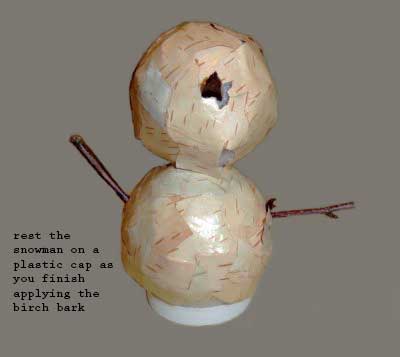
5. Continue adding birch bark until the whole snowman is covered. At this point, you can also glue a small jar lid to the bottom of the snowman with the flat side down. This will help to keep the snowman nice and stable. You could also just flatten or cut the styro-foam at the bottom so that it sits flat. I will be covering the lid with snow-tex later.
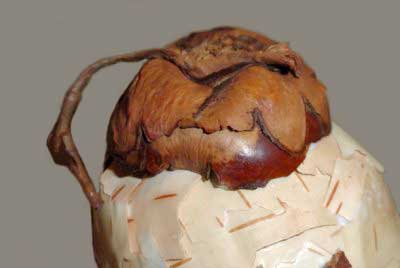
6. Find a piece of potpourri or acorn top to use as a hat. I found a cool piece that even had a stem that could pass as a tassle on a hat! Glue this to the head with tacky glue.
7. I used petals from a pine cone, cut down to size, for the eyes and used tacky glue to adhere them in place. You could also use small buttons, felt or beads.
8. For the scarf, I first just simply tied a thick piece of yarn around it’s neck but then decided to add more. Instead, I added a couple of strands of raffia and some jute string to my yarn and then tied the entire bundle around it’s neck. This made it look a bit more substantial. If you recycle sweaters, you could also cut a strip from a sweater to use as a scarf.
9. Finally, I applied some snow-tex to the lid base with a firm paint brush and the project was complete!
This snowman craft was fun to create with all of the rustic elements. Give this one a try to add to your rustic decor for the winter season! Another idea would be to make my authentic looking snowballs instead of using birch bark. Or, if you don’t have birch bark but like the look, then just paint the balls to look like real birch bark.
Hello I’m now following you from Twitter (bellydancer87), I love the blog!
Will you follow me back?