Sometimes a DIY project comes upon you like a sneak attack! I was actually quite busy with Christmas and wedding projects when I happened upon this great chair makeover by DIY Showoff. It showed how to paint an upholstered chair and I was intrigued.
I was first taken in by the cool design of the chairs but was further amazed when I found out that she had actually painted the upholstery. And, I was even more surprised that it was possible to go from a colorful patterned upholstery to a clean white painted fabric.
I thought it was the coolest thing ever and started to make a note of it for a future project. It would be a fun thing to do if I ever came across an old chair. Then I almost fell off my chair (a different chair) when the realization hit me that I had an old chair. Not only did I have a chair but it had ugly upholstery that I had wanted to change! DUH!! I had a great wing back chair that we had purchased when we were first married. It was beautiful when we bought it. However, that nice country pattern of blue and mauve wasn’t doing anything for me. I didn’t want to pay to get it re-upholstered and had previously slip covered it.
Now I could hardly wait to try this painting technique on my chair and get a brand new look!
Painted Upholstery Tutorial
The technique for how to paint an upholstered chair actually came from Hyphen Interiors and that is what I used for the most part. Since this tutorial includes special products to be used, I have included sponsor links to one or more of the products required. This way, if you click on the product link you will have the ability to purchase if desired.
Instead of using three coats of paint, like the tutorial from Hyphen Interiors, I ended up using four coats. I did make my first two coats very thin but also the fact that I was going from a dark checked pattern to white made a bit of a difference as well.
1. Mix The Paint In A Bucket
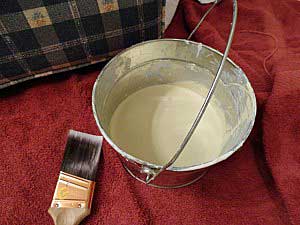
For the first coat of paint, I used 16 oz. of latex paint plus 16 oz. of Delta textile medium. The paint I used was what I already had on hand. With mixing the Monroe Bisque with white , I got a cream color. Then, I added 16 ounces of water to the paint mixture so that is was the consistency more like a glaze.
I mixed it in a bucket for easy carrying:
2. Spray The Fabric Before Each Coat Of Paint
To get a good blending, I sprayed the chair with water as I painted, with each coat of paint:
3. Use Enough Coats To Get A Good Coverage
Starting with the second coat, I went right to using the acrylic paint.
It isn’t supposed to matter whether or not you use latex or acrylic, so I decided to go with the exact color that I wanted to finish with. Although, I could have saved a little money and done one more coat with my latex mix but at the time I wasn’t sure what the coverage would be.
Most of my coverage came after coats three and four.
I used Delta brand Ceramcoat acrylic paint in antique white. I bought the 8 oz. size bottles and used two for coat number two along with two 8 oz. bottles of Delta textile medium.
For coat number three, I used three bottles of the paint but then switched to Martha Stewart’s textile medium and used three 6 oz. bottles of that with only a couple tablespoons of water for a thicker consistency. The reason I switched was because both Joann and Michaels were sold out of the Delta. Martha Stewart’s brand was quite a bit thinner in consistency which also helped with needing less water but it was more expensive.
I mixed up more paint than what I needed for the fourth coat. It didn’t soak it near as much. I also didn’t add any water at all to the last coat. It went on smoothly and the coverage is great.
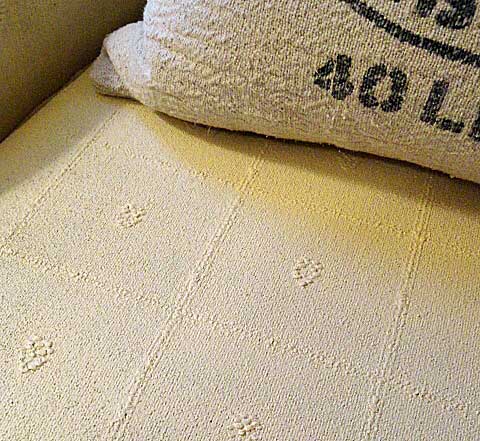
Here is a close up:
You can see the pattern but I now have a solid color. It feels like a painted canvas but it won’t crack or flake. I will keep you updated on how it holds up….because I do sit in this chair!
4. Before And After
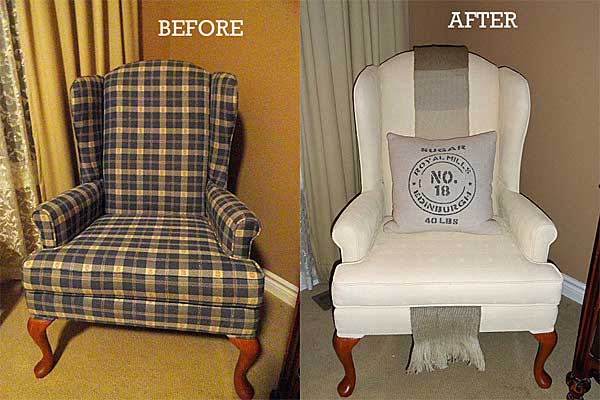
I love to see the before and after:
The lighting is pretty terrible in this room for pictures!
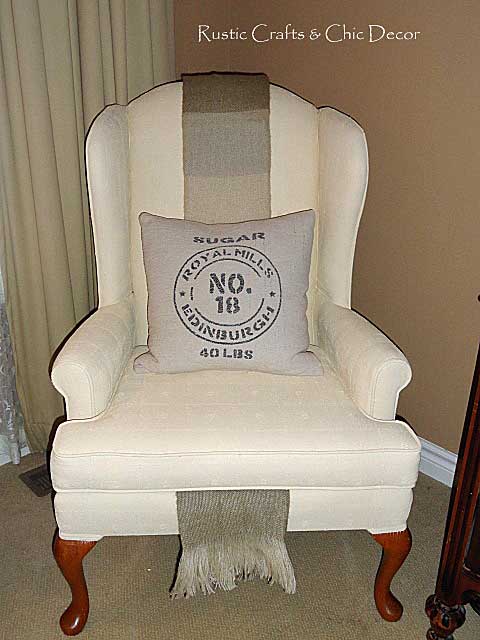
The chairs that were done by DIY Showoff had a painted stripe going down the middle. I love the look but I was a little tired of painting. To add a little softness to my chair, I simply folded a throw and hung it down the center of the chair and underneath the cushion. I threw on a favorite grain sack pillow and my look was complete!


It does have a more stiff and slightly scratchy surface. This process is probably better for an accent chair versus one to lounge in. However, it is very durable.
Hi Renee, Was wondering about texture of material after painting. Is it stiff or pliable? Was wondering about comfort and feel of material. Thanks.
I have a recliner that is faux leather and that thing is peeling away viciously. It’s so bad that I have little pieces of brown faux leather on the floors in my home 24/7. Can I paint this recliner as is or should I re-cover it with something that is cheaper but paint worthy, then re-paint it? Thanks for all your advice.
I love DIYs, and I have quite a bit of experience with acrylic paints. In my experiences with acrylic paint, when using plenty of paint, it will chip off when folded. My question is, will the paint not flake when someone sits on the chair?
Hi Myriam,
No, the paint mixed with the textile medium and all of the water keeps it from flaking. It does have a rougher, more like canvas, feel when finished but it doesn’t chip. My chair is still holding up strong after two years.
How is it holding up?? I foud a chesterfield on CL for free and would love to finish it this way. Tips?? LOVE YOUR BLOG!!!!!!
It’s still holding up great Teresa! I’m so glad I did it. I think it would be great to try on your free chair! Good luck!
Hi Renee, I am about to try painting a chair. I have one question. When you do the second, third and fourth coat, do you still have to spray with water or is that only on the first coat?
Wow! I was very happy to come across this! We just purchased a used pop-up camper and the seating is outdated. I’m not a seamstress so I knew recovering was out for us. My only concern is comfort too, not that we do much sitting in the camper! The original material was a little scratchy feeling anyway, so I must try this!!!!!!!
Sounds like the perfect project! Good luck with it and let me know how it works out for you.
I was so glad to see a chair done in this color.
You did an amazing job on it. I have bought a cream colored wing chair for $10 that is pretty dirty and faded, I want to leave it the same color but try the paint technique. Hoping that leaving it the same color might be a little easier for my first project.
Thanks for your excellent post!
Thank you Carol! I think you will be happy with this technique. It’s a great way to freshen up the look. I love that you bought the chair for only $10! 🙂
I wonder if there is anything that can be added to the paint to make it softer to the touch once dried? I have an over sized off white couch and chair I’d love to do this to. I’ve seen upholstery paint being sold in spray cans that says it doesn’t change the feel of the fabric at all but it’s pretty expensive. Maybe this would be a more cost efficient way to go?
I haven’t seen the upholstery paint in cans to know what the cost is but the method I used is fairly reasonable at about $6 per 8 oz of textile medium plus $6 per 8 oz of acrylic paint.
What a great tutorial ~ I’m glad to know you sit in it and I’ll be looking forward to hearing updates on how it holds up.
I wonder if adding a bit of fabric softener to the paint mix would work? Incredible job!
Cool idea. Want to try it,so will look for a chair at flea markets in spring. Explained technique to hubby, he rolled his eyes ….. Here she goes again!
haha…well good luck finding a chair – it’s a fun project!
Wow! This looks amazing. I have a very similar chair in very similar fabric. (Mine is an off-white fabric with mauve and light blue, in the same pattern.) I have wanted to have it reupholstered for several years, but was a little leary of the cost. My only question is, how does it feel when you sit on it? Is it hard and scratchy?
It is definitely more stiff than it was before but and a little scratchy. But, I was surprised at how well it holds up after sitting in it. I was afraid that with painting it it might crack but it’s not like that at all. I think it is still comfortable to sit in but I wouldn’t do it on furniture I wanted to cuddle up in. It is great for a side chair or a more formal chair.
Wow! Painted upholstery? Who knew? Can you paint vinyl, as well? Great job; great inspiration.
I have not tried it on vinyl but I have heard that you can.
That is awesome!!! Unbelievable, isn’t it? It’s still work, but much less so than re-upholstering or sewing a clip cover and with a beautiful result. Great job! Thanks so much for linking to me…I’m so happy it worked out for you too! It’s beautiful! 🙂
Thank you Roeshel! Your chairs were such an inspiration. Who knew?
Thanks for linking to my tutorial! I’ll add your chairs to my page with all the examples!! It looks so much like DIY Showoff’s. I love it. Turned out fabulous! Thanks for sharing!
You’re welcome Kristy! I was so glad to have it to follow and am happy with the results. I appreciate you adding this to your chairs page :).