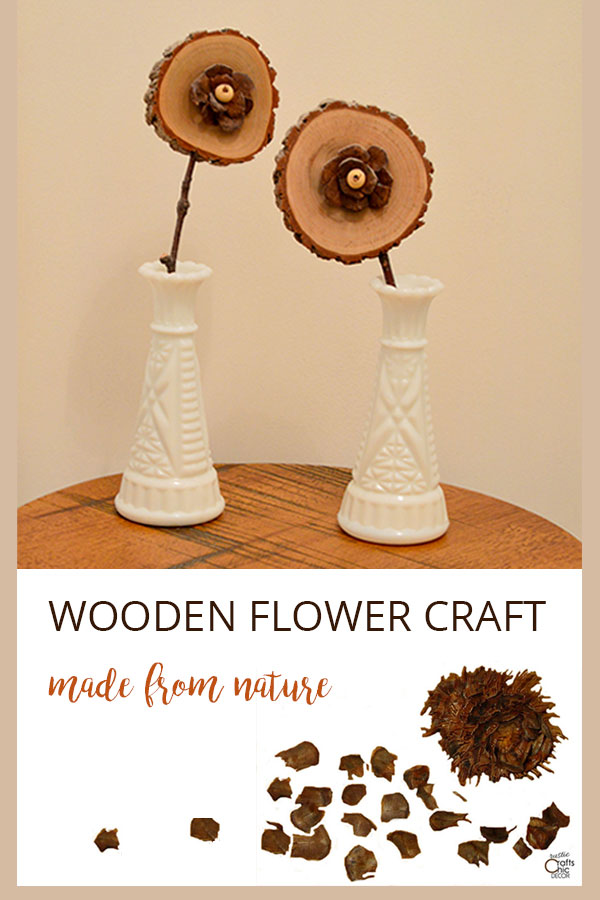
Normally, I love to have fresh flowers around my home. However, in the middle of Winter, I have found another alternative. Wooden flowers, made from tree slabs and pinecone petals, are great to fill those vases with some warm and rustic goodness. They are easy and fun to make and the best part is that they can be entirely free!
You can either purchase a small tree slice, about three to four inches in diameter, from a craft supply store. Or, you can cut your own tree slice from a small log. My husband cut slices for me with his chop saw and I cleaned and dried them for use in this project. Pinecones can also be purchased or collected from the woods. I purchased my pinecones on sale from a craft store. They quite often go on sale after Thanksgiving, making that a great time to pick up a bunch. If you collect pine cones from the woods, make sure to dry them before using them in a project. All you need to do is bake them for about an hour at a low temperature like 200 degrees. Watch them carefully. You don’t want them to burn. Since they may leak some sappy liquid, you will want to place them on an old cookie sheet or a sheet of tin foil.
Save any nice tree branches that you need to prune or that you find fallen in the woods. If they are still fairly fresh they can be used in several different craft projects.
Wooden Flower Materials
- 3 to 4 inch diameter wood slice that is about 3/4 inches thick
- 12 inch twig or branch (for stem)
- one pinecone
- spray polyurethane
- E6000 craft glue or hot glue
Tools Needed: drill, floral cutters, *optional chop saw
How To Make Wooden Flowers
Skill Level: Moderate
Rustic Craft: Wood Flowers
Step One: Starting from the base of the pine cone, cut the scales from the pine cone with a floral cutter. These will become the petals for your flowers.

Step Two: If you are cutting your own pine slices, cut from a three to four inch diameter pine (or other) tree trunk, about a half inch to 3/4 inch thick with a chop saw or hand saw.
Step Three: Start gluing the petals onto one of the pine slabs with some tacky glue until you have a flower design that you like. Glue a wooden bead to the middle. Cut some of the tough stringy strands left on the pine cone and insert these, with glue, into the middle of the bead to act as the pistil.
Step Four: Drill a hole, the size of your birch branch, into the base of the pine slab. Cut your birch branches to the size that you want them to be when they are inserted into your vase. The top end should insert into your pine slab at least one inch. Place some E6000 craft glue at the top of the branch and insert it into the drilled hole of the pine slab.
Step Five: Spray the entire flower with a semi-gloss polyurethane to protect.
Your wooden flower is now ready for display!

What a really neat idea! I’ve got plenty of those supplies lying around here to make a dozen or more 😉
Oh that’s great! You could fill a whole flower box 🙂