My narrow back entry hallway has been in need of a makeover for quite some time. I have been putting it off because the “perfect” idea just hadn’t come to me. However, this past weekend I thought of a unique DIY board and batten project.
I have been in love with the board and batten look and knew that I wanted to incorporate that into my design. However, with our hallway being so narrow I was a little concerned about adding too much bulk to the walls….at least to both sides.
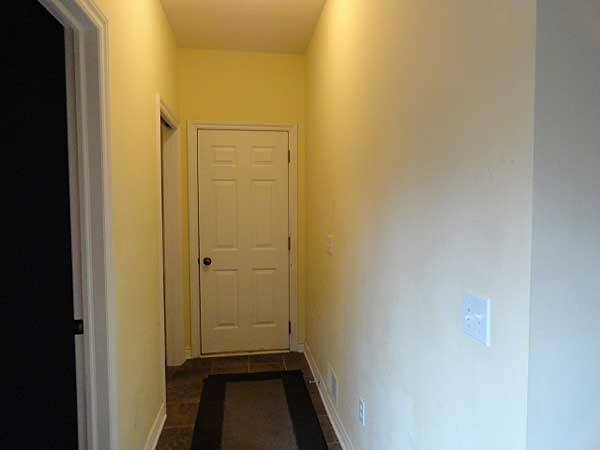
Here is my before picture:
So over the weekend, with the boys away hunting, I became inspired with a plan to do board and batten just on the wall between the two doors. I would make hooks for hanging and all would be good. The opposing wall I would paint a soft gray to coordinate with the buttery yellow.
Armed with a plan, I took all of my measurements for the wood that I would need to purchase. Then, I ran down to my craft room for…I can’t even remember what…and by best laid plan was forever changed!
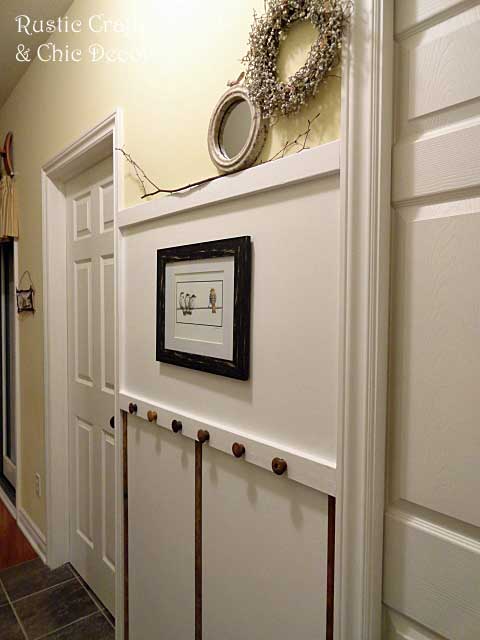
I spotted, in a corner, some vintage yard sticks, and a light bulb went off! Oh my gosh! I could use those for some cool looking boards on my wall instead of the thicker MDF. It would be a bit unusual but I’m okay with that. Looking around further, I found some old vintage wooden knobs that I was now going to use for my “hooks”.
I had to redraw my plan because the yard sticks were much shorter than the length I was planning on for the boards which were going to go almost 3/4 up the length of the wall.
Because I now only needed two 38 3/4 inch sections of 2 1/2 inch MDF, I decided to use some scrap trim that we already had leftover from our cabin.
DIY Board and Batten
Supplies Used:
- 2 – 2 1/2 inch x 38 3/4 inch scrap trim
- 3 vintage yard sticks
- 6 vintage wooden knobs
- Behr Premium Plus Semi Gloss Enamel -pure white
- caulk
- Loctite construction adhesive
- E6000 craft glue
- level
Since my wall was smooth, I did not purchase any type of board like plywood or even whiteboard to put on the wall. You really get the same look by just painting the trim pieces and the wall with the same white paint.
My first step was to cut my scrap trim to the proper size. I used my Dremel for this:
For most projects, where I would be attaching trim, I would use a brad nailer. However, since I was placing the trim pieces snugly between two doors, in this project, I simply put a bead of construction adhesive on the back of the wood and then pounded each piece into place. I used a level to make any necessary adjustments by pounding one end or the other slightly with a hammer.
To get a nice finished edge against the wall, it is important to use caulk to fill in any tiny gaps. I have a tool for smoothing out the caulk but find I do a much better job with my finger.
An advantage to using the yard sticks for my vertical pieces is that I didn’t have to switch out my base trim. This is something that I would have had to do if I had gone with my original plan for normal boards so that the boards could butt up to the base without hanging over.
I hung just the top piece of trim first, then painted the trim, the wall and the piece that was still not attached. After the second coat was dry, I attached the yard sticks with a small amount of construction adhesive. Finally, I attached my last horizontal trim piece.
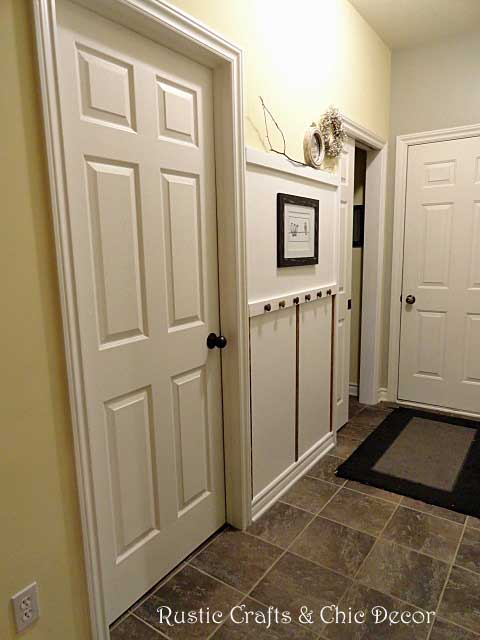
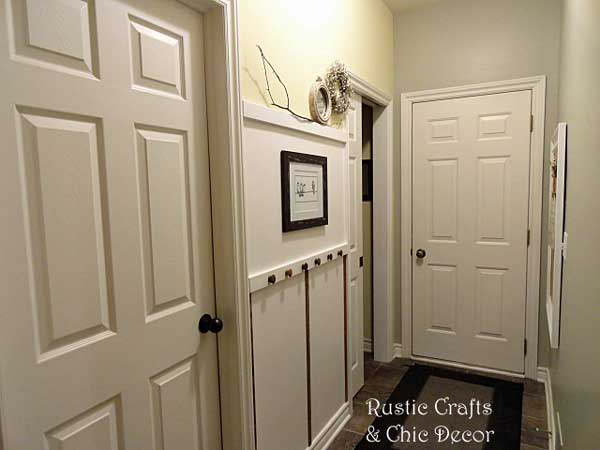
Finished Board and Batten Wall
My goal was to make my hallway warm and inviting. By adding the vintage wood pieces, I think I was able to accomplish this.


I love what you did with just a few yardsticks and some knobs. It looks lovely.
This looks like something I could do temporarily with velcro and yard sticks in my rental home, since the yard sticks are light enough to hang without putting holes in the wall.