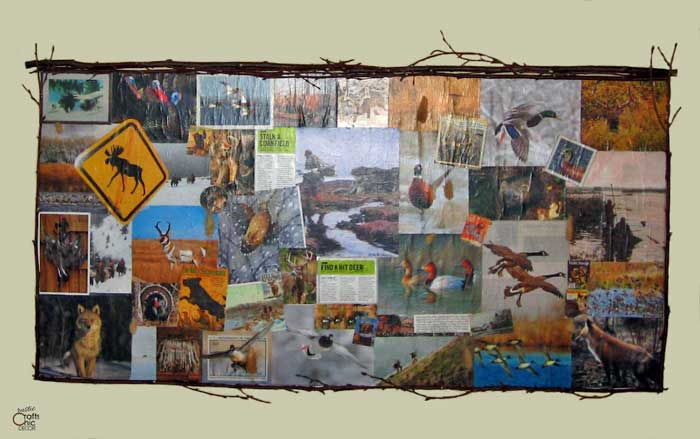
Have you ever looked at a blank canvas and wanted to create your own art? If you’re not a great painter, you can still make some creative wall art. One way to do this is to create a collage of favorite images. I needed to fill a wall in our cabin basement and decided to have a little fun with magazine cutouts and Mod Podge. Images from outdoor magazines provided just the right theme for our rustic space.
If you’ve never used Mod Podge before, prepare to be blown away! This one product will adhere, seal, and protect your work of art. You may have seen people preserve puzzles in this way. By coating the puzzle with Mod Podge Puzzle Saver, the pieces stay together for art. I like to use Mod Podge to make coasters as well. It’s such a fun and inexpensive idea.
To get the images onto the canvas, I just had to decoupage them with Mod Podge. When you decoupage on canvas you get some brush marks from applying the Mod Podge. This is similar to what you see in a painting. I’ll show you what I created to inspire you for your own project.
This post contains recommended product links. If you make a purchase through one of these links, I will earn a small commission at no extra cost to you.
What Type Of Mod Podge To Use?
There are different types of Mod Podge to use depending on the project you are doing. The Mod Podge used on puzzles or coasters will be different from the Mod Podge used on canvas. However, if you accidentally pick the wrong one, it won’t be the end of the world. The decoupaging will still work but choosing the right type will ensure the best quality for your particular project.
For decoupaging on canvas, I recommend using just the basic Mod Podge. It comes in three sheens, glossy, satin, and matte. I prefer the satin sheen because it is more forgiving. Chances are pretty good that you will have a few little wrinkles in the finished product. A glossy finish would show off those wrinkles big time. However, a softer satin finish will hide any wrinkles or blemishes easier while still giving a subtle sheen. If you don’t want any shine at all, then matte is a perfect option as well. All three finishes work exactly the same way.
Supplies To Use
- Basic Mod Podge – I use satin finish
- magazine cutouts, construction paper, or paper copies of photos
- paint brush or foam brush
- brayer – optional for smoothing out wrinkles
- canvas
How To Use Mod Podge On Canvas

Decoupaging the images, using Mod Podge, is a great way to create a collage. The Mod Podge glues, seals and finishes the magazine clippings to the canvas. All you have to do is brush some Mod Podge on to the back of your picture and then place it onto the canvas, smoothing out any wrinkles.
I still got some wrinkling on some of the thinner paper. Since I could tell right away that they weren’t going to smooth out easily, I could have easily removed them but opted to keep them since the image wasn’t affected. There was just a little more texture. After getting the pictures in place, I put a thin coat of Mod Podge on top of the images with a soft brush. Following, are the easy step by step instructions.
Decoupaging On Canvas Steps
Step One: Cut Out Your Images And Layout The Design
I laid out a basic plan to coordinate colors and sizes. Then, I cut out several extra pieces as well in case I needed more fillers. When I was sure I had enough images to cover the canvas, I removed a section of cutouts and began to adhere them in place.
Step Two: Apply Mod Podge To Canvas In Sections
Where I had removed the cutouts, I brushed on a layer of Mod Podge. Then, I began to apply the cutouts by pressing the paper onto the Mod Podge layer. At this point, I just smoothed them in place with my fingers. Once the first section is done, remove the next section of cutouts from the canvas and repeat until the entire canvas is full. Let this dry completely for about twenty minutes to a half hour.
Step Three: Apply The Finish Coat Of Mod Podge
Using a stiff brush, I applied a medium coat using an artist’s stroke to show the brush marks like a painting. This gave it some depth and more texture. If you want a smoother finish, apply a thin coat with a foam brush and use a brayer to help smooth out any wrinkles. Once dry, apply another thin coat in the same way.
That’s all you have to do for the decoupaging on canvas. At this point, you may want to style the edges for a more finished look.
Step Four: (Optional) Frame The Canvas
I simply framed the entire canvas with birch branches. Using hot glue, I pieced the branches together on the canvas, intertwining as I went. You could also use things like dowel, yardsticks, picture frame wood, or anything thin and long that will complement your artwork.
This project would also be great to do in a kids room with images of some of their favorite things or maybe an exercise room with inspirational messages. Or, an easier project would be a small canvas with just one special image. A flat magazine or poster image can look a lot more decorative when decoupaged to canvas with the depth and brush strokes.
For more fun projects with canvas, check out the following posts.
